
Month: March 2018
Fancy Bears hackers target International Olympic Committee
Originally seen on Tech Target and written by: Madelyn Bacon
News roundup: The hacking group called Fancy Bears claims to have hacked the Olympics again.
A hacking group that calls itself Fancy Bears posted email messages allegedly from officials at the International Olympic Committee (IOC), the U.S. Olympic Committee (USOC) and other associated groups, like the World Anti-Doping Agency (WADA). There’s no confirmation yet that the email messages are authentic, but Fancy Bears focuses on anti-doping efforts that got Russia banned from this year’s Olympic Games.
“The national anti-doping agencies of the USA, Great Britain, Canada, Australia, New Zealand and other countries joined WADA and the USOC under the guidance of iNADO [Institute of National Anti-Doping Organisations],” Fancy Bears said on its website. “However, the genuine intentions of the coalition headed by the Anglo-Saxons are much less noble than a war against doping. It is apparent that the Americans and the Canadians are eager to remove the Europeans from the leadership in the Olympic movement and to achieve political dominance of the English-speaking nations.”
Fancy Bears is believed to be the same hacking group known as Fancy Bear that claimed responsibility for the 2016 hack on the U.S. Democratic National Committee, which interfered in the 2016 presidential election. Fancy Bear hackers have been linked to Russia’s military intelligence unit, the GRU, by American intelligence officials.
The batch of email messages Fancy Bears posted is from 2016 through 2017 and mainly focuses on discrediting Canadian lawyer Richard McLaren, who led the investigation into Russia’s widespread cheating in previous Olympic Games. It was because of the findings in his investigation that many Russian athletes are banned from the 2018 games in Pyeongchang, South Korea.
The IOC declined to comment on the “alleged leaked documents” and whether or not they are legitimate.
It’s not clear how Fancy Bears allegedly breached the IOC email. However, in 2016, the same group targeted WADA with a phishing scheme and released documents that focused on previous anti-doping efforts following the 2016 Summer Olympics. In that case, the hacking group released the medical records for U.S. Olympic athletes Simone Biles, Serena and Venus Williams and Elena Delle Donne. The medical records showed that these athletes were taking prohibited medications, though they all obtained permission to use them and, thus, were not violating the rules. This release happened in the midst of McLaren’s investigation into the widespread misconduct by Russian athletes.
In one email released in this week’s dump, IOC lawyer Howard Stupp complained that the findings from McLaren’s investigation were “intended to lead to the complete expulsion of the Russian team” from the 2016 Summer Games in Rio de Janeiro and now from the 2018 Pyeongchang Games.
What do you think about this alleged Olympics hack?
The Basics of Cyber Safety
As seen on Tech Target by: John Sammons and Michael Cross.
In this excerpt from chapter four of The Basics of Cyber Safety, authors John Sammons and Michael Cross discuss basic email security.
The following is an excerpt from The Basics of Cyber Safety by authors John Sammons and Michael Cross and published by Syngress. This section from chapter four explores the basics of email and email security.
Email is a term that’s short for electronic mail, and a common method of exchanging messages over the Internet. You’ll use an email client, like Google mail or Outlook, installed on a computer, an app on your mobile phone, or a website to create and read the messages. The email is sent to a mail server, which is a computer that’s used to store and forward messages.
To demonstrate how this works, let’s say that you’re going to send me an email. If you have an email client installed on your computer, you’ll write a message to me and click the send button. That message is sent to a mail server, which may be one provided by your Internet Service Provider (ISP). If I had an email account with another ISP, or a free email service like Gmail, the mail server would forward that email onto the mail server that I use. It would be stored in a mailbox, which would be an area on the mail server that’s designated for mail going to my account. When I retrieve the mail online, I would be accessing that mailbox, and see your email in an area for mail I’ve received called an Inbox.
As we’ll see in the sections that follow, there are a lot of potential problems with using email, but there are settings and decisions you can make to protect yourself. You may have information of some kind included with the email called an attachment, which could be virus infected. It could have links in the email that may take you to a site to fool you into providing sensitive information or automatically download and infect your system with malware. By knowing what to look out for, and configuring your email client properly, you can safeguard yourself and minimize these and other threats.
EMAIL PROTECTION
Depending on what you plan to do on the Internet, it’s advisable to setup separate email accounts for different types of online activities. By this, we’re not saying that you should have different email addresses for each of the sites you commonly visit. The kind of email accounts you have will be based on what they’ll be used for and your need for privacy. Some of the ones you might have include:
- A generic account, which is often the first one you have when you sign-up for Internet Service. This will be the one you commonly give to friends, family, and others you want to stay in contact with.
- Work email, which is used for business purposes. This may be one created for you by your employer, and should only be used for work-related purposes.
- Social media email, used for sites like Facebook, Twitter, and so on.
- Email account(s) for chat, instant messaging, shopping, promotional sites, or other sites where you want additional privacy.
There are many reasons why you’d want separate accounts. One is that you should never use work email for personal reasons. Many companies have policies dealing with proper use of technology, and using corporate email to sign up on sites, chat, or simply sending personal messages could result in disciplinary actions or even termination of employment. As we saw in Chapter 1, What is cyber safety?, companies own any email account issued to you, meaning that they can access your mail, and you should have zero expectations of privacy.
The Basics of Cyber Safety
Authors: John Sammons and Michael Cross
Learn more about The Basics of Cyber Safety from publisher Syngress
OUR EMAIL REVEALS
Generally, when you sign up with an ISP, you’re issued an email address that includes your name in it or your first initial and last name. For example, my email address might be michaelcross@domainname.com or mcross@domainname.com. In looking at it, you can see that all or part of my name is included in the address. As we’ll see throughout this book, these little tidbits of information can be used with other information gathered about you, and reveal more than you want to know.
Before setting up any accounts on social media sites, chat rooms, and so on, you should seriously consider setting up one or more email accounts with less revealing information. In doing so, the name used for the email account should include nonidentifying information. For example, using an email address like snickers@domainname.com may indicate you’re a happy person, but it doesn’t reveal who you actually are.
NOTE
Understanding the Importance of Nonidentifying Email
Keep in mind that your family and friends already know your full name, but many of the online “friends” or connections you make are actually strangers. You never want to reveal more to a complete stranger than necessary, and one of the biggest identifiers of a person is their name. To illustrate a problem with revealing email addresses, let’s say you used a chat site, discussion board, or instant messaging (which we discuss in chapter: Beyond technology — dealing with people) to meet new people and have online discussions. When you set up an account to use any of these, you’re probably given the option of creating a username or alias, so that when you’re chatting other people would see you as “Big Bob” or some other name you came up with. Now, consider that one of these people decided to check your account profile, and saw your email address. If it included your real name, the stranger now knows who you are, and the anonymity and protection provided by an alias or username is lost.
Depending on your needs for the account, you should also limit any information included in a signature in messages. For work email, you might include your work number, extension, company website, business address, and so on. However, you do not want to include this in other emails being sent, unless there is a specific and exceptional reason to do so. Even if you send personal information in an email to someone you trust, there is no guarantee that they won’t forward it, or include others in the reply that would show the original information you sent.
CHOOSING AN EMAIL CLIENT
There are a number of good email clients available, but the one you choose will often depend on the operating system you’re using, and the amount of money you’re willing to pay. The email client you use may be one that’s installed on your computer, or an online version that you access through a browser. Some of the email clients that can be installed on a computer include:
- Microsoft Outlook, which runs on Windows and Apple and is commonly used by businesses. It’s included with Microsoft Office or Microsoft Office 365.
- Apple Mail, which is Apple’s email client.
- Thunderbird, which is available for Apple, Linux, and Windows machines.
Securing Thunderbird
In this section we’ll go through a number of common settings found in email clients that are installed on your computer, using Thunderbird as an example. Thunderbird is a popular, free email client from Mozilla that can be installed on Windows, Apple, and Linux machines, and has a number of features that can be configured to improve your
features should be available under the client’s settings. To configure Thunderbirds Privacy and Security settings:
- After opening Thunderbird, click on the Tools menu, and then click Options.
- When the Options dialog appears, click on the Privacy icon at the top to display a screen similar to that shown in Fig. 4.1.
- Click on the Allow remote content in messages so it appears unchecked. This will prevent any images or other content from being automatically viewed in the email. We’ll explain more about why it’s important not to allow this in a section that follows.
- In the section dealing Web Content, if you don’t want cookies (which we discussed in chapter: Before connecting to the Internet) to be used, you can click on the Accept cookies from sites checkbox so it appears unchecked. You can then click on the Exceptions button to specify which sites are always or never allowed to use cookies. To view the cookies on your machine, click the Show Cookies button, where you can then remove them as desired.
- Click on the Tell sites that I do not want to be tracked checkbox so that it’s checked. This will send a request not to track your activities, opting you out of any tracking systems on a site you’re accessing, so that tracking cookies aren’t sent to your computer.
To modify the security settings in Thunderbird, you would click on the Security icon at the top of the Options dialog. Upon doing so, you’ll be presented with several tabs of options, where you can make the following modifications:
- On the Junk tab, you can configure settings to train Thunderbird to detect junk mail or SPAM, and specify what happens to email. You can flag an email as junk mail in Thunderbird by right-clicking on a message, selecting Mark, and then clicking As Junk. On this tab, you should do the following:
- Click on When I mark a message as junk so the checkbox appears checked, and then either select the option to move it to a junk folder. This will automatically move any junk messages to the account’s “Junk” folder. Alternatively, you can click on the Delete them option, so that your junk mail is automatically deleted.
- Click on the Mark messages determined to be junk as read checkbox so it appears checked. In doing so, the message won’t appear as unread, meaning there’s less chance of you accidentally opening it.
- Click on the Enable adaptive junk filter logging so the checkbox appears checked.
- On the Email Scams tab, click on the Tell me if the message I’m reading is a suspected email scam so the checkbox appears checked. If the email has known elements of being a scam, you’ll be presented with a warning.
- On the Anti-Virus tab, click on the Allow antivirus clients to quarantine individual incoming messages so it appears checked. This will allow your antivirus software to remove any infected messages before you read them.
- On the Passwords tab, click the Use a master password checkbox so it appears checked. After checking this, you’ll be prompted to provide and confirm a password. The next time you open Thunderbird, you’ll need to enter the password, preventing anyone else from opening Thunderbird and reading your email. To change the password afterwards, click on the Change Master Password button on this tab.
- Click OK.
WHY IS IT IMPORTANT TO BLOCK REMOTE CONTENT?
When an email is opened, or viewed in the message pane of an email client, it’s possible for content from a server to appear in the message. If the email is in an HTML format, then you’re viewing a message that’s written in the same language as a web page. Any external content can be displayed in the message as if you’ve visited the sender’s website. Your email client will load any images, including ones that have an executable (Malware) embedded in it, and other content from an external server. While allowing remote content allows you to view any graphic content automatically, it isn’t a secure option.
Another problem with allowing remote content is that it can be used to verify your email address. If I send you a SPAM message, when you load the remote content, your client is contacting my server and requesting that the content be sent. I can now see that you made that request, and can see that it’s a legitimate email account that’s still in use. In verifying that email, I know to contact you further with either additional email, or (as we’ll see in chapter: Cybercrime) attempts to phish additional information out of you.
Also, additional information about you is sent with the request to a Web server for images and other content. The browser or email client will identify the application being used and the operating system its running on, which could be used by a hacker to identify possible vulnerabilities or target distribution of malware. The request will also include your IP address, which can be used to get a rough idea of your location.
When you block remote content and open the email, images and other external content don’t appear in the message. If I want to view the blocked content, I can click on a link at the top of the message to display images and other content, or if I trust the sender to always allow remote content from that sender.
HIDING THE MESSAGE PANE
A common feature in email clients is the Message Pane, which allows you to view the contents of any emails that you select in your inbox. It is a little deceptive in making you think that you haven’t opened the email, as you haven’t double-clicked on it so it opens in a new window. However, the Message Pane does open and display the contents of your email, and (depending on your settings) will display any of the images or external content used. As we mentioned, because emails can be written in HTML, the email client is acting like a browser, and you’re loading the equivalent of a web page with all the potential threats one can provide.
Hiding the message pane allows you to review the subject, sender, and other information listed in your inbox, but won’t show its contents when you click on it. This allows you to select different emails that seem suspicious or appear to be SPAM, and delete them as needed without opening them. To remove the message pane from Thunderbird, click on the View menu, select Layout, and then click Message Pane.
THE DANGERS OF AN ATTACHMENT
The message in an email is only one of the potential threats to your system. Files can also be attached to a message, and these have the same potential risks of files that you download from sites. Documents may be virus infected, and executable files (such as those with an .exe extension) may be attached to install malicious software on your computer. Even though the attachment is with the file, they only pose a threat if they’re activated.
Never open any attachment if you don’t know the sender, or the email seems suspicious. Even if you know the sender, it’s possible that the message and attachment was sent automatically by malware, and the actual person the email says it’s from doesn’t know that the email was sent. To avoid many of the known problems with attachments, ensure that the settings to allow your antivirus program to scan and quarantine email is enabled. If your antivirus can catch and remove infected messages, there’s less chance you’ll open a file that will infect your system.
FREE EMAIL SITES
You could contact your ISP to have additional email accounts setup for various purposes, or you could set them up yourself through an online service. There are a number of sites available for setting up additional email accounts that are free, including:
- Gmail (www.gmail.com), which is a free email service from Google.
- Outlook (www.outlook.com), which was is Microsoft’s email service formerly called Hotmail.
- mail.com (www.mail.com), which provides the ability to choose different domain names in the email address.
These free email services allow you to store and access your email online, using a web-based interface to read and compose messages. Some of these have almost unlimited storage, while others require you to pay for premium accounts that allow you to store mail and attachments over a certain limit. These sites may provide additional features and services that may be useful, such as online calendars and file storage.
When looking at the features of free online email, you want to ensure that the service provides virus checks and good SPAM filtering. As we have seen in Chapter 10, Protecting your kids, antivirus protection will prevent unwanted code from corrupting your data or system, while SPAM filtering will keep unwanted advertisements, scams, and other inappropriate, dangerous, and/or unwanted email from getting into your inbox. Even if you have antivirus software installed on your computer, it’s important to realize that it will not scan and protect email and attachments stored on one of these sites. The email is stored on the email service’s server, so you need to ensure that they provide adequate protection before you download or open anything that’s been sent to you.
SECURITY SETTINGS ON EMAIL SITES
The security settings on free email sites vary. All of them will allow you to change your password, which as we saw in Chapter 2, Before connecting to the Internet, should be done on a recurring basis and use strong passwords. Beyond this, the features you encounter will vary.
While it would be impossible to cover the settings in every online email service, looking at a couple of popular sites will give you a good idea of what’s offered, and how to configure it properly. In the following sections, we’ll look at Mail.com and Gmail. For any email service, you’ll generally find the security and privacy settings for your email under your account settings.
 SYNGRESS
Mail.com security
If you’re using mail.com as a free email service, you would login and see a link in the left pane of the screen called Settings (as shown in Fig. 4.2). Clicking this, you would then click on the Mail Security link under Security. Doing so provides you with a number of options, which when checked will activate the related feature:
- Spam protection activated, which will prevent SPAM emails from being added to your inbox.
- Contacts, which will prevent emails from people in your contact list from being flagged as SPAM. Generally, you can turn this off to prevent junk email that may have been automatically forwarded by people you know from appearing in your inbox. We saw how bots can do this without a person realizing it in Chapter 10, Protecting your kids.
- POP3 options, which has a checkbox that indicates you’d like to be sent a daily report about SPAM that may have been received. This allows you to release or delete any mail that may have incorrectly been flagged as SPAM.
- Virus protection activated, which checks your incoming and outgoing mail for viruses.
Other options in the security section of your mail.com account include:
- Whitelist, which allows you to add email accounts and domains that should always be trusted, and never marked as SPAM.
- Blacklist, which allows you to add email accounts and domains that should never be trusted, and you never want to receive mail from. This is especially useful if you are being harassed by a person, getting unwanted email from a company, or know that a particular site is a problem.
- External content, which after being clicked, shows a page with a checkbox that allows you to prevent any content hosted on an external site (such as images) from appearing in your email. If this is activated, a link will appear in your email that allows you to show the images, and does not apply to any emails in your SPAM folder (which already keeps external content from being displayed).
GMAIL SECURITY
Gmail offers a number of features designed to protect your privacy and enhance the security of using email. After logging into Gmail, you can access your settings by clicking on the gear shaped icon in the upper right-hand corner, and then clicking settings. After doing so, you’re presented with a screen with tabs along the top of the screen. Clicking Accounts and Import will provide you with a variety of options to maintain your account, including a section called Change account settings. In this section, you can click on any of the following links:
- Change password, where you can enter a new password, and will tell you the strength of that password.
- Change password recovery options, which provides the ability to set recovery options if someone hijacks your account, or your password is forgotten. We’ll discuss more about this shortly.
- Other Google Account settings, which presents a screen of additional options to control your account preferences, and options and tools related to your privacy and security settings. Again, we’ll delve deeper into this in the paragraphs that follow.
The password recovery features in Gmail allow you to set what happens when you forget your password or it appears an unauthorized person is trying to get into your account. The options on this page allow you to set the following:
- Mobile phone, which (after providing your phone number) will be used to send a text message. Because an unauthorized person probably wouldn’t have your mobile phone, this ensures that you’re the person who the account belongs to.
- Recovery email address, which can be used to challenge someone attempting to logon, and allows you to reset your password if you’re locked out.
- Alternate email address, which allows you to specify a secondary way to log onto your account. This would be a different email address than your gmail.com account.
- Security question, which allows you to set a question and answer that will be used to establish that you’re the person who should be logging in.
The Other Google Account settings link takes you to the My Account page at https://myaccount.google.com, where you can access settings that control your account preferences, personal information and privacy (which we’ll discuss further in chapter: Protecting yourself on social media), and sign-in and security options. The My Account page also provides tools for doing a checkup on your security and privacy settings, and will take you step-by-step through setting many of the options we’re about to discuss.
If you click on the Signing in to Google link, you’re given a number of options we’ve already discussed, including the ability to change your password, provide a recovery email address, provide a phone number to recover your account, and set a secret question. You’re also given an option in the Password and sign-in method section to use 2-Step Verification.
When 2-Step Verification is used, you would log onto Gmail as you normally would, but after entering your password, a code is sent via text, voice call, or the Google mobile app. This feature becomes especially important if you use untrusted computers or devices to access your mail, such as public computers. You must then enter this code to access your mail. To set up Google’s 2-Step Verification, follow these steps:
- After logging into Gmail, go to https://myaccount.google.com.
- Click on Signing in to Google.
- Click on 2-Step Verification.
- Click Start setup.
- When the Set up your phone page appears, enter your phone number.
- If you want Google to send you a text message with a code, click the Text message (SMS) option. If you want a voice call, then click the Voice Call option.
- Click Send code.
- When you receive the code, enter it in the box on the Verify you phonepage, and then click Verify.
- When the Verification codes on this computer screen appears, check the Trust this computer checkbox if you’re using a trusted computer (such as your home computer). In doing so, you might still be able to access your account without a code.
- Click Next.
- When the Turn on 2-step verification screen appears, click Confirm.
The next link on the My Account page is the Device activity & notifications link, which provides important information about how your account is being accessed. Here, you’ll find information on security events (such as password changes, modifications to your account, and so on), and devices that have recently been used to access the account. It shows the current device you’re using to access your account, as well as any other computers or mobile devices that were previously used. You should regularly review this section to determine if someone else is accessing your account. If something seems amiss, you can click the Secure your account link to change your password, review settings, and add or change recovery information that we discussed earlier. If you don’t think you’ll regularly visit the page to monitor this (as is the case with most people), you should click the Manage Settings link under Security alerts settings. In doing so, you can set whether you’ll receive an email and/or text message when there is a security risk (such as someone trying to access your account) or other account activity (such as when security settings are changed).
The final link is Connected apps & sites. As we saw in Chapter 1, What is cyber safety?, various apps on your mobile device or sites may connect to your Gmail account. By clicking the Manage Apps link on this page, you’ll be able to view which apps have access, and what they have access to (inclusive to such things as your mail, calendar, contacts, or basic account info). If there’s an app you no longer use, you would click on the Remove button beside the app’s name to complete revoke its access. The page also provides a Saved Passwords section, where you can manage passwords saved with Google Smart Lock, which we discussed in Chapter 2, Before connecting to the Internet.
At the bottom of this section, you’ll see an option to Allow less secure apps, which should be turned off. If an app uses less secure technology to sign-on, it can leave your Google account vulnerable, so by default this option is turned off.
NOTE
Other Ways of Checking Gmail Security and Privacy
You can also access your security settings by going to https://myaccount.google.com/security, and your privacy settings at https://myaccount.google.com/privacy. These sites will present you with the same options that we previously discussed related to security and privacy.
ENCRYPTION
There may be times when you need to send an email that’s secure, ensuring that no one other than the person it’s intended for reads it. There are a number of options available for encrypting messages, some of which require installing software like add-ons or extensions to your browser, while others are simple and straightforward.
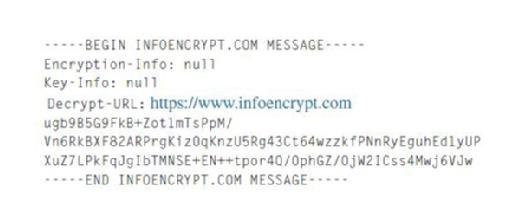
Infoencrypt (www.infoencrypt.com) is an easy to use site, in which you type a message in a box on the web page, and provide and confirm a password. After clicking the Encrypt button, the page reloads and the message in the box is encrypted. For example, if you were to enter a phrase like “This is encrypted” and used the password test, it would return something like what follows:
 SYNGRESS
The message itself is meaningless, unless the recipient uses the correct password to decrypt it. You would copy and paste the contents of the box and email it to the intended recipient, secure in the knowledge that no one else can read it.
When the recipient receives it, they would click a link that takes them to Infoencrypt’s website, where he or she copies and pastes the email message into the box, and enters and confirms the password you provided separately. After clicking Decrypt, the message is then revealed.
Another tool you can use to encrypt email sent through Gmail is a Google Chrome extension. By visiting Chrome’s Web store at https://chrome.google.com/webstore/, you can search for “Secure Mail for Gmail” and find the Secure Streak Gmail extension. Alternatively, you can also type the nightmarishly long URL https://chrome.google.com/webstore/detail/secure-mail-for-gmail-by/jngdnjdobadbdemillgljnnbpomnfokn and go directly to it. By clicking Add to Chrome, and then clicking Add Extension when the dialog appears, it will install in the browser.
Read an excerpt
Download the PDF of chapter four in full to learn more!
Once the tool is installed, you can then logon to Gmail (www.gmail.com) and you’ll see a new red button with a padlock icon beside the Compose button. Clicking the padlock icon will open a new message dialog. After composing the email, you’d then click the Send Encrypted button.
After you click the button to send your encrypted email, a new message will appear asking you to enter a password and provide a secret hint. The hint should be something that only the recipient would know the answer to, thereby revealing what to enter as a password. After filling this out, click the Encrypt and Send button.
The message that the recipient receives will be encrypted. If they receive it on a standard email client, it will include a link to install the Secure Streak Gmail Extension. If they already have the extension, they will see a link to decrypt the email, and when clicking it will be asked to enter a password and see your hint. After providing the password, the message is decrypted.
About the author:
John Sammons is an Associate Professor and Director of the undergraduate program in Digital Forensics and Information Assurance at Marshall University in Huntington, West Virginia. He teaches digital forensics, electronic discovery, information security and technology in the School of Forensic and Criminal Justices Sciences. Mr. Sammons is also adjunct faculty with the Marshall University graduate forensic science program where he teaches the advanced digital forensics course. A former police officer, he is also an Investigator with the Cabell County Prosecuting Attorney’s Office and a member of the West Virginia Internet Crimes Against Children Task Force. Mr. Sammons is a Member of the American Academy of Forensic Sciences, the High Technology Crime Investigation Association, and Infragard. He is the founder and President of the Appalachian Institute of Digital Evidence, a non-profit organization that provides research and training for digital evidence professionals including attorneys, judges, law enforcement and information security practitioners in the private sector.
Michael Cross is a SharePoint Administrator and Developer, and has worked in the areas of software development, Web design, hardware installation/repairs, database administration, graphic design, and network administration. He is also a former Computer Forensic Examiner with Police Services in the Niagara Region of Ontario, Canada. Working for law enforcement, Mr. Cross was part of an Information Technology team that provided support to more than 1,000 civilian and uniformed users. He performed digital forensic examinations on computers involved in criminal investigations. Over five years, Mr. Cross recovered and examined evidence involved in a wide range of crimes, inclusive to homicides, fraud, and possession of child pornography. In addition to this, he successfully tracked numerous individuals electronically, as in cases involving threatening e-mail. Mr. Cross has consulted and assisted in numerous cases dealing with computer-related/Internet crimes and served as an expert witness on computers for criminal trials. In 2007, he was awarded a Police Commendation for work he did in developing a system to track local high-risk offenders and sexual offenders. With extensive experience in Web design and Internet-related technologies, Mr. Cross has also created and maintained numerous Web sites and implementations of Microsoft SharePoint. This has included public Web sites, private ones on corporate intranets, and solutions that integrate them. In doing so, he has incorporated and promoted social networking features, created software to publish press releases online, and developed a wide variety of solutions that make it easier to get work done
What does NYACP think of us?
ITG remains committed to their clients day in and day out. Whenever you need someone, you know who to call. Mike and the ITG team care so much about the clients that they want to spread the word. Although it may be strange if Mike stood on a rooftop yelling about all the ways they can help someone, we figured the clients could tell you best. We recently interviewed Linda from NYACP, New York Chapter American College of Physicians, to get her take on ITG and to find out more about what she does!
NYACP is a not-for-profit professional service organization providing education,  advocacy and quality improvement/practice management for 12,000 internal medicine physicians in New York state. Linda loves that her work focuses on improving healthcare and helping members achieve success in the ever-changing practice environment.

In a world of such uncertainty and change, wouldn’t you want to feel that passion? Every business will suffer from technological issues, updates and threats to operations by viruses and other intrusions. Lucky for Linda, her limited IT experience was in hiring the right consultant. She has better peace of mind within the company since working with ITG. She has been able to learn more about technology as her business grew and came to better understand the impact of technology and interoperability. This allows her to feel more comfortable with her entire IT infrastructure allowing her to focus more on management and operations.
She was first introduced to ITG by word of mouth from colleagues. After interviewing others and assessing the best choice, Linda chose ITG because of their experience and local reach. She has not been disappointed, and its been years working together! When asked what the process is like to work with ITG she said: “They are a sound, reliable partner, they respond to our needs expeditiously and completely.” She considers the ability to ask questions and get “helpful, meaningful information in easy to understand language (and Diagrams!!!)” to be the best value for a busy executive.
Did you Know……….
- Her favorite part of working with ITG is “the staff, the reliability of their recommendations and their service”!
- There are laws and regulations in place that require companies to take measures to prevent data breaches and other attacks.
You too can have the peace of mind in your day to day life by partnering with a company that cares about your business, answers questions and immediately responds to concerns. Reach out to ITG today and speak with the team about how they can help!
